Showing posts with label experiment. Show all posts

Wednesday, 3 September 2014

Persephone Cosplay

I came across this absolutely stunning dress by Lyrota which I've fallen completely in love with! It's really inspired me to do something on a similar vein for Glasgow Comic Con 2014, and Persephone is one of my absolute favourite goddesses. Please go check out Lyrota's work, it's absolutely stunning and she's talking about possibly selling a gown similar to her work in the future. 

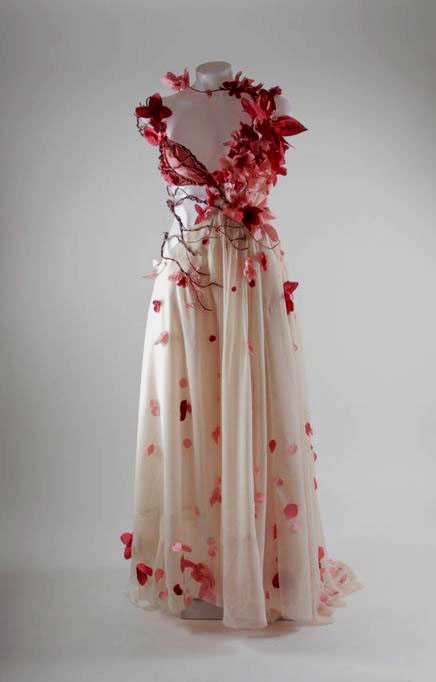
Lyrota's Persephone dress


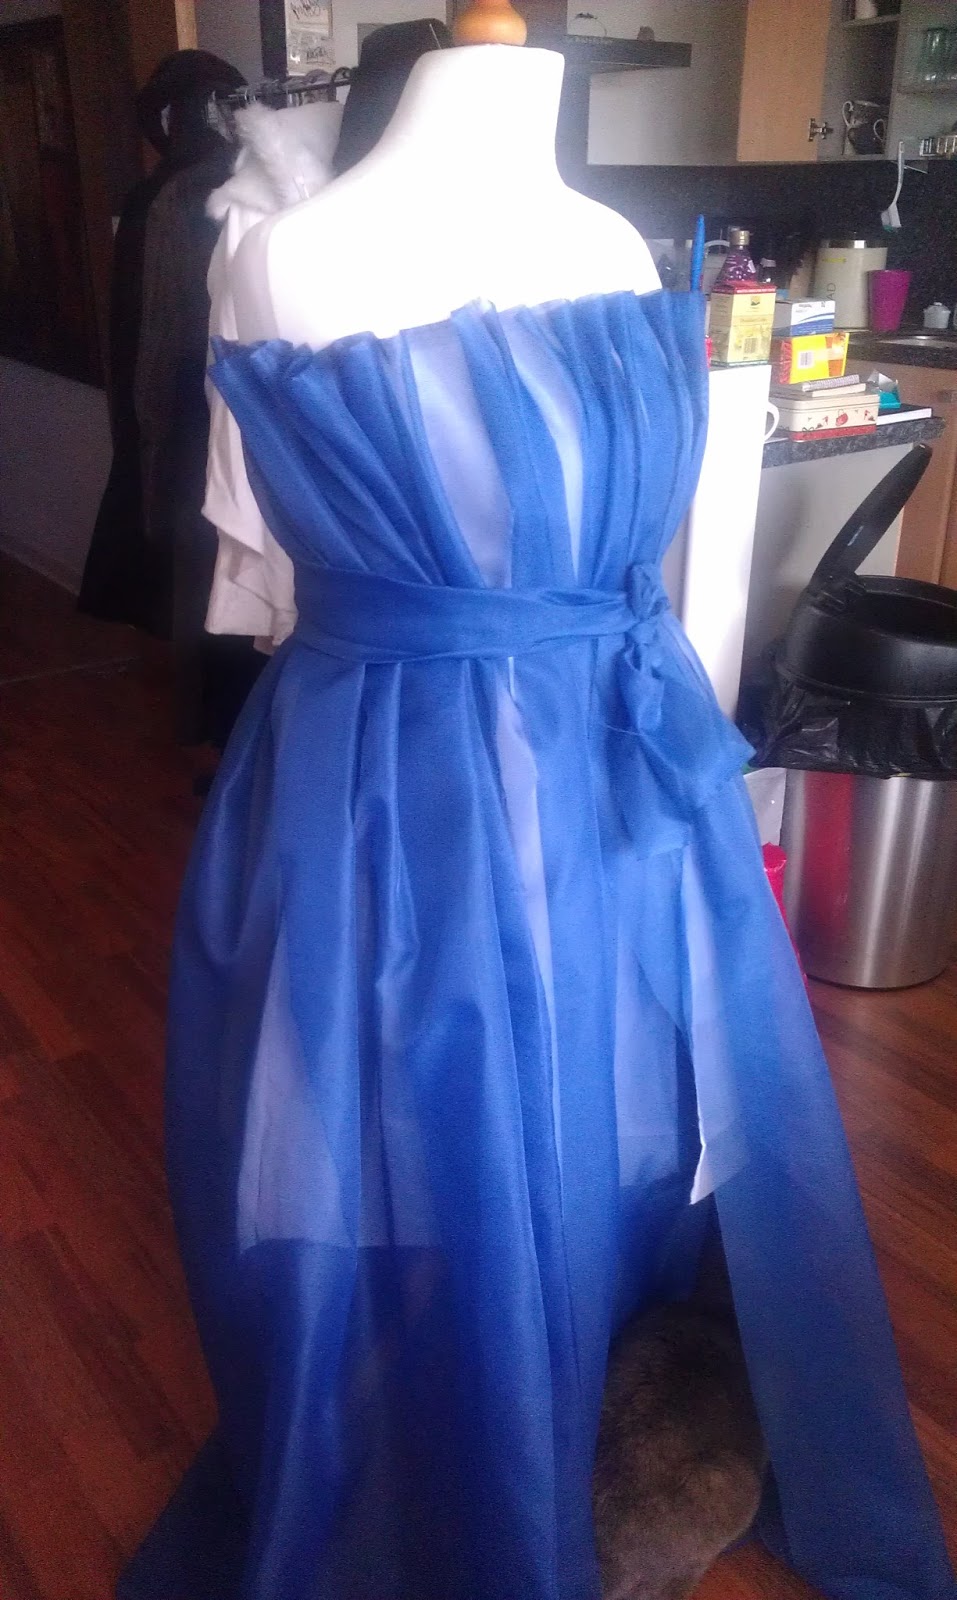
I began by draping a rectangular piece of cream chiffon over the mannequin (which I now regret and If I did it again I would create a v-shaped bodice), cut a slit for my head and then gathered the overhang together very tightly for the shoulders. I covered the gather with a wee bit of burgundy lace from the waist tie. I pinned and hand stitched some little gathers into the waist of the back to give it a little more shape


 After that I added flowers to the back, and then to the front, and then to the back again.
Back
Front

 The tree branches were made from this fantastic wire bark which I ended up having to order from the US. I absolutely loved it though. It was attached to the shoulder and then wound down the back and then around the waist. Then more flower petals were added. I bought 500 of them but probably only used about 400 which were all glued on with fabric glue.


Front
Back
 Then came the fun part. I really wanted to dip-dye the bottom of the fabric but knew that dye would never take to the chiffon which I was pretty sure was polyester, so I bought some acrylic ink, mixed it with a little water and put it in a spray bottle. After repeatedly spraying, letting it dry, and spraying both the top and a rectangular under layer of chiffon I was happy with the result (as well as having a very pink shower). I then glued about 200 flowers on to the bottom, which was a lot harder than it looks.

At long last! Finished
I then fashioned myself a crown out of some of the remaining tree bark wire and added some little wire berries that looked a bit like pomegranate seeds.


 I began hand beading this wonderful necklace pattern I found. I really wanted a big thick, heavy necklace which made people think of pomegranate seeds.


 And this was the final result!


Photo on the day from Alasdair Watson Photography

Thursday, 13 June 2013

DIY Lolita dress: The Blue dress

I would like to be very clear that I take no credit for the design, and this was more an exercise in me getting to use my mannequin for the first time (kindly now dubbed Shirley - I have no idea why).

I first came across this dress a few months ago, and absolutely adored it, but knew there was no way I would fit into it. While it says it's free size, that's free size in Japanese sizes, so I'm already dubious, and when it states that the maximum waist size is 100cm I know I'm out (my waist will fit, but my bust is 112, and there's no way there's an extra 12cm in the bust. For anyone who's wishing to purchase the original dress, it is available in a wide range of colours from Krad Lanrete's shop on Taobao.


Now this is the first dress I have ever made without a pattern, so I started off by decontructing the dress in my head. I noted that it's a button up dress, lined, gathered at the bust (and probably the waist too, but more likely shirred), with ruffling detail around the collar and ends. So I figured I'd start with lining and basically pin it to the mannequin to make it fit. I put my petticoat on the manniquin so I could see if I would be getting the right kind of poof.


I ended up with 4 parts to the lining. Two front, one back with a triangular panel added at the back so the skirt part poofed out more. Now I was happy with how the lining was shaped while pinned, it was time to stitch the it together.

Now for the chiffon. I started basically the same way as I did the lining, only this time I added 3x as much fabric as I had for the lining on the front and back, and 1.5x the amount on the sides. Once it was pinned, I trimmed the lenth, tryking to make it slightly longer than the lining (and failing). At this point came the boring work: gathering. I painstakingly hand gathered each part (working front right, underarm right, etc around the body). I started noticing that I really wasn't happy with the fabric. It had the same see-through properties of the dress I'd been inspired by, but didn't seem to hang right. I took a good 15 minutes to correct all the folds in the second image. I hoped when I added more to the dress it would begin coming into place and sitting right.


.

Next for the collar. I pinned in place a tube of chiffon fabric (turned right side out), and gathered the collar in too places, about 2cm from each edge to create the ruffled look, then added some navy braid to hide any wonky stitching. I then added the button up part (interfaced) and tried the dress on. At the moment I really don't like this dress. I like the idea and the style, but after putting it on (and hurray! It fits!) I feel a bit like I'm in a costume for Violet Beauregard just after she eats the blueberry gum in Charlie and the Chocolate Factory. I figure with a corset or waspie or something that defines the waist (more than just the sash) it would look better, but I think a big problem is the fabric. I'm going to go on a hunt for better chiffon and see what I can find.