Friday, 12 September 2014

DIY Lolita: Mary Magdalene inspired/replica dress UPDATED

I have always loved Mary Magdalene  dresses. They have a really simple design that I love and a little while ago I completely fell in love with this style. Unfortunately, Mary Magdalene sizes are small even for Japanese lolitas, so I figured I'd try and make one for myself. DISCLAIMER: In general I'm not a fan of replicas and certainly not a fan of replica dresses being sold when they take business away from the original desiner. The reason I've made this for my own personal use is because I know I will never be in a position to wear on of Mary Magdalene's dresses for myself, and I want to use this simplistic cut for my own work. I ideally would like to get to a skill level where I could simply be "inspired" by this design, but at present I feel the finished article style is too close to the original for me NOT to call it a replica.

Going for something like this
Fabric and trim (didn't end up using the rickrack)
Firstly I used Anny's Princess Seamed Bodice Generator (available here) to make the bodice because I find usual princess seamed patterns don't really accommodate my shape. However, the generator only really helps you make the bodice, and doesn't tell you anything above the top bust, so I drew it out, stitched it together, then lay some calico under the bodice and drew in where I wanted the arm/shoulder parts to be.


I tried it on, and it was WAY too big. so I tailored it at the sides and front, and started laying out the new pattern on the fabric. To start I cut out the lining just to check I liked the shape, then laid the lining piece very carefully over the fabric, as I really wanted to make sure the stripes lined up correctly on the finished dress.
Lining on mannequin with a petticoat for shape

 I used a tutorial on Riley Blake Designs to make the scalloped edging on the neck and on the hems. The easiest way to do this is to cut a facing out of the same fabric, mark the scallops, stitch them together and cut them out as close to the stitching as you dare (about 0.5cm)

Also remember to measure the hem and divide evenly by the number of scallops you want. If I remember correctly there were 10 scallops on the front and 6 on the back.


 Once you've cut the excess flip them right way out and PRESS! This is incredibly time consuming but totally worth it.


The sleeves were a very simple capped sleeve tutorial which I sadly miscalculated my measurements, so while the sleeves fit they are a little bit small. Then I added the cream crochet trim to the neckline, sleeve ends and scalloped hem.


 All that was left was to hand gather (why do I do this to myself) 7 strips of 150mm dark green fabric to make the ruffles on the bottom. I didn't quite like the way it sat at the back, so I added some of the dark green fabric to make a sash and break up the shape a little.

Final touch was some pearls, and a straw hat and as many cream/pink/white roses as I could find (which was 7, as well as a little rose I made from scrap fabric)
Of course I blinked as the photo was taken!


Wednesday, 3 September 2014

Persephone Cosplay

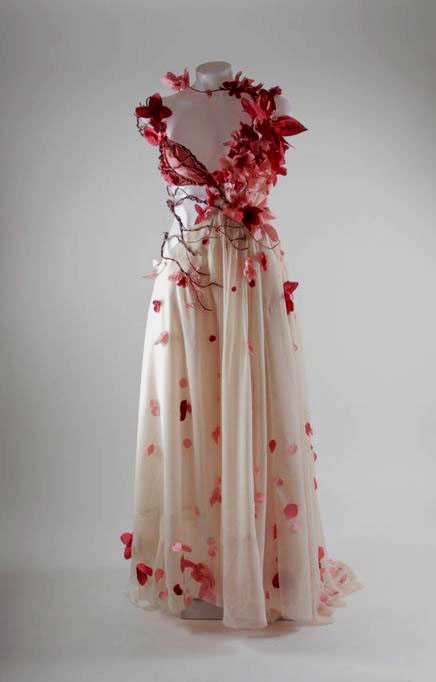
I came across this absolutely stunning dress by Lyrota which I've fallen completely in love with! It's really inspired me to do something on a similar vein for Glasgow Comic Con 2014, and Persephone is one of my absolute favourite goddesses. Please go check out Lyrota's work, it's absolutely stunning and she's talking about possibly selling a gown similar to her work in the future. 

Lyrota's Persephone dress


I began by draping a rectangular piece of cream chiffon over the mannequin (which I now regret and If I did it again I would create a v-shaped bodice), cut a slit for my head and then gathered the overhang together very tightly for the shoulders. I covered the gather with a wee bit of burgundy lace from the waist tie. I pinned and hand stitched some little gathers into the waist of the back to give it a little more shape


 After that I added flowers to the back, and then to the front, and then to the back again.
Back
Front

 The tree branches were made from this fantastic wire bark which I ended up having to order from the US. I absolutely loved it though. It was attached to the shoulder and then wound down the back and then around the waist. Then more flower petals were added. I bought 500 of them but probably only used about 400 which were all glued on with fabric glue.


Front
Back
 Then came the fun part. I really wanted to dip-dye the bottom of the fabric but knew that dye would never take to the chiffon which I was pretty sure was polyester, so I bought some acrylic ink, mixed it with a little water and put it in a spray bottle. After repeatedly spraying, letting it dry, and spraying both the top and a rectangular under layer of chiffon I was happy with the result (as well as having a very pink shower). I then glued about 200 flowers on to the bottom, which was a lot harder than it looks.

At long last! Finished
I then fashioned myself a crown out of some of the remaining tree bark wire and added some little wire berries that looked a bit like pomegranate seeds.


 I began hand beading this wonderful necklace pattern I found. I really wanted a big thick, heavy necklace which made people think of pomegranate seeds.


 And this was the final result!


Photo on the day from Alasdair Watson Photography

Thursday, 28 August 2014

Incredibly quick Disney Spring Sprite cosplay

I'm sorry for being so quiet! I've been completely wrapped up in my first year of civil engineering which is why it's taken me so long to post anything.

For last year's MCM Expo scotland I was crazy busy with other things, but really wanted to cosplay something. Disney's Fantasia 2000 has been one of my favourite movies, and I still watch it every time I'm sick. My favourite character has to be the spring sprite.


I ended up some very cheap chiffon, and in an attempt to get the floaty shape I decided to go with a kimono style dress. Technically no pattern was used, I basically flung it on my mannaquin and hoped for the best.

I had about 9m of fabric, 6m in a light green, another 3m in a very dark green (and a sash of a mint green, left over from the chemise I did). I split the light green fabric into two sections of 3m, lay the light green over the dark green and then cut a slit for my head. At this point the fabric fell off my shoulders by quite a ways, so I hand gathered it until it sat nicely on my shoulders, exposing my arms.


.

I then stitched up either side, leaving enough space for my arms to poke out, and cut the remaining 3m of green fabric in half lengthways, stitched bottom and sides together to make sleeves


A bit of hemming, a wig, some accessories and some make up later I'm ready to go!


In total the costume only took me about 2-3 hours to make, so it's far from perfect but I don't think it was bad for something that was thrown together on a whim.

Thursday, 26 June 2014

Box Pleated Blue Skirt (or what I did with the blue dress)

If you remember from a few posts ago I attempted to make a blue chiffon dress... that didn't work out so this is what I did with the fabric!

[photo complete]

It's a baisc rectangle skirt only this time I tried doing box pleats rather than gathering. The easier way to do this (I've found) is to start marking your skirt with however wide you want the please. If you want them to be 2 inches long (as I've done), then start marking two inches along the wrong side of the fabric.


Then, start folding. Fold so that the dot a 0" on the ruler is directly over the dot at 2", so you have about an inch going towards the right (pin in place). Do exactly the same on the other side going the opposite direction, so that the dot from 6" is directly over the dot at 4"
Now you should have a 2" long bit of fabric in front (kind of looking like a box) of your fabric strip. Now stitch it in place.


And very importantly IRON IT. That'll leave you with nice crisp edges. You don't have to iron it all the way down, just a few inches to make sure it has the sharp edge.


Now add a waistband and you're done!


Tuesday, 17 September 2013

Victorian Dress 1888/9. Rating: Ambitious!

I'm beginning an exciting new adventure. My mother very kindly bought me my now favourite pattern book: Directoire Revival Fashions 1888-1889. It contains a grand total of FIFTY SEVEN patterns from that year; everything from chemises to bonnets to coats/wraps, skirts, blouses and dresses! There is a full chapter too on just the decoration of Victorian clothing (and the techniques of how to do some of the more ornate pieces), and it can be purchased here if anyone's interested. I've picked a dress from page 360 of the book, which I'm informed is an "Empire Costume" (though I have no idea why, it doesn't really have an empire waistline) and a little bit annoyingly doesn't actually have a pattern.

The Pattern

The book has a pretty good breakdown of what each part of the dress should look like and how it's fitted together. There are these two pieces at the front, which fold over each other into a V, very much like a wrap dress. Over the top there is a girdle, which holds the bodice in place and the skirt is attached too it. The description is rather confusing, as it talks about the lining and the drapery. I believe that it's actually two skirts, one made of lining and one of the dress fabric (you'll only really see the trim of the lining fabric, underneath the zigzag part of the picture, which I think is meant to be the end of the drapery). At least, that is how I'm going to try and make it. The back of the dress is a polonaise of a contrasting fabric, that still holds the dress together.

Now that I know the different parts of the dress, I have to find a pattern for them. While there are 57 patterns in this book, there are only 6 full dress patterns, and then a number of different drawings of how the same pattern can be done to create totally different looks. A few pages back from this image there is an "Evening Costume" which has the same V neck/wrap shaped bodice as the empire costume. I take the front, sleeve and cuff pattern from that, a polonaise pattern from the polonaise section. The skirt has four gores, the book tells me, of which look like rectangles which are gathered into shape. The only problem is that there is NO pattern for the girdle. Anywhere. So this will be fun.

Colours


Quick photoshop recolour, just to show you
The dress that never was

I bought myself some lovely white/light blue stripped cotton for the bodice/skirt, and have some navy blue cotton/silk for the polonaise, girdle and underskirt. These were bought not for this dress, but for another Victorian one that sadly never made it past the enlarging stage. The patters in Directoire Revival Fashion are specifically designed to be made in to a number of different sizes and can account for my curvy shape.


The Mock Up

This is the first time I've every used this book for a proper dress (though the chemise pattern came from here, though I knew that was going to be large enough that I wouldn't really have to make a practice piece). The pattern has to be hand drawn, and some of these pieces are HUGE (would not fit on an a0 page huge), so I ended up drawing them on AutoCAD to save my back, and had them printed out locally (only then did I realise I forgot to print out the sleeve pattern, so will have to do a mock up of that later). I used some old curtain and upholstery fabric to make the bodice and polonaise (didn't think it was worth making the skirt as it's simple).

I'm not 100% happy with the mock up, but I think it'll look batter with the skirt added (ignore my black petticoat). The girdle is just pinned on for show, and the polonaise needs the bustle under it to look better. I didn't bother with the neck collar in the end, as I think this looks better. The polonaise is far too short, which was due to restrictions in the amount of fabric I had lying about, but I'm really happy with the lines on the back. Next, cut the real fabric (and hope I have enough)


Sunday, 15 September 2013

DIY Lolita dress: The blue dress 2.0, the nint dress

A good few months ago I started work on a replica of Krad Lanrete's Le Chuchotis de L'été, an it didn't go so well (see here).  The biggest problem was I didn't like the weight of the fabric, and recently came across some mint green chiffon which was much heavier. I decided to scrap almost the whole thing and painstakingly unpicked everything so all that was left was the lining. BEGIN AGAIN.

The Dress Body
I lay the unpicked blue chiffon over the uncut green to get a basic idea of how much fabric I was going to be using (3m) and where the arm wholes were going to be. Then started pinning it to the mannequin. The easiest way to get the folds to look right was to stick a pin at the beginning of a section (eg, at the front of the arm whole) and at the end of a section (eg, the back of the arm whole), then a pin in the middle of the excess fabric, so you have two large loops of extra fabric. Keep halving the sections until you're happy with it, and can easily gather it. I realised very early on that most of this dress was going to have to be hand gathered. I worked my way around the dress pinning it into place until I thought it looked good, and tied a ribbon around the waist just to see if it sat right.


Then hand gather the chiffon and secure it to the lining. I found it easiest to stand and slowly work my way around the mannequin unpinning little sections then gathering them with thick black thread (so it would be easy to see and remove later. At the end of every section I pulled the thread taught and tacked the chiffon to the lining so that it didn't all fall off when it tried to take it off the mannequin.

The Waist
Next, the waist. The green ribbon marks the waist line, so I took a fabric pen and marked underneath the ribbon, removed it, and then gathered the fabric until it was taught against the lining.


The Neckline
 The neckline was the same principle again. I cut a long strip of fabric which was the length of the front, back and around the arms, then that length was doubled so that it could be gathered. It was cut 2 inches wider than it had to be, and an inch folded over on both sides all the way along the fabric piece (so you have one long strip with an inch tube at the top and bottom. I pinned the open ends at the front and kept halving the material until it sat correctly, then hand gathered it in place, with the gathering going along the stitching of the tubes.


However, once I tried it on I discovered that the gathering over the arms makes it very difficult to move. I stitched the neckline to the dress along the front and back, then added elastic on the parts that looked like capped sleeves to make movement easier. I stitched the top tube to a piece of netting just to make sure it held all the gathers in place.

The Ruffles
The dress body is 3m of fabric, so to make ruffles on the bottom I needed double that, so 6m of 15cm wide chiffon was overlocked (which was a complete pain in the ass, as it gathered the chiffon slightly) and then hand gathered (I tried repeatedly to machine gather and it just didn't seem to work) to the right length. Then I pinned it to the dress. The whole process took 4 hours (mostly because I had to regather half the ruffles because I got a knot in the thread.

Almost finished. Just the buttons and sleeves to do! So far it's looking good.


UPDATE. In a mad rush for an event 2 summers ago I finished the dress, wore it, and immediately sold it. PREPARE FOR EMBARASSING PHOTOS

As much as I enjoyed making this I'm incredibly uncomfortable with the colour. I was encouraged to buy it by someone else and only when I finally put it on did I discover it doesn't suit me at all. I also was a lot larger then and did an ABSOLUTELY hash job at co-ordinating it, as I realised I had nothing to go with it. However, I thought you should see the finished dress.


Tuesday, 16 July 2013

Victorian Chemise - Image heavy

A chemise is the undermost of all Victorian undergarments, often made from white cotton or linen, designed to protect the corset (and garments) from bodily dirt. It is a long, sleeveless dress, and the neckline style has varied over the Victorian era from square or round and undecorated, to more decoration and triangular necklines acceptable for day wear (initially they were for evenings only). It eventually evolved into slips in the early 20th century.

I attempted to make one without really doing a lot of research into what was acceptable for the time period, and took the pattern from Directoire Revival Fashions 1888-1889 (edited) by Frances Grimble. Absolutely fantastic book but quite complicated to use. All patterns have to be drafted from the book, but they are very simple and have a variety of scale rulers so you can draft your size without having to make too many calculations. Just measure bust size for bodices, waist size for skirts and away you go.


The pattern, as you can see, is for a square necked chemise with lace trim and insertions around the arm holes and neckline. In the description on the page over it suggests you add fine tucks and lace to the bottom (which I ran out of time to do). The second pattern piece is the yoke which I have absolutely no idea what to do with, so I omitted it.


Restricted by both my small table and my terrible laziness, I started drafting straight onto the fabric (huge pain in the ass, and entirely NOT recommended. I only managed because this is a very simple pattern. Easiest to measure down from the fold, then out at a 90 degree angle to do the widths.


Other issue with drawing straight onto the fabric, 90 degree angles are not 90 degrees anymore


Tiny table isn't very good for sewing
Next it was just a case of draw lines between all the dots, cut out one piece, and lay it over the rest of the fabric and trace it out.

Unfortunately I derped and didn't have quite enough width of fabric. To be fair, the chemise is so massive it's not really noticeable


Stitch the sides together and shoulder pieces together, and you will have a tent. Seriously, it is HUGE, but it is meant to be. What I should have done now was gather along the bottom of the neckline on both back and front, then add trim, but I decided not to do that so that I could have a bit more flexibilty of what I wear over the chemise (think it'd look silly of I try to wear it with a v-necked Victorian bodice). So add all the trim

Lace over green ribbon around the neck, with cord so that I could tighten/loosen the neck
Green around the arm holes, just because it's pretty.


And this is it being warn under corset and skirt (ignore my scruffy face)