Showing posts with label chiffon. Show all posts

Thursday, 28 August 2014

Incredibly quick Disney Spring Sprite cosplay

I'm sorry for being so quiet! I've been completely wrapped up in my first year of civil engineering which is why it's taken me so long to post anything.

For last year's MCM Expo scotland I was crazy busy with other things, but really wanted to cosplay something. Disney's Fantasia 2000 has been one of my favourite movies, and I still watch it every time I'm sick. My favourite character has to be the spring sprite.


I ended up some very cheap chiffon, and in an attempt to get the floaty shape I decided to go with a kimono style dress. Technically no pattern was used, I basically flung it on my mannaquin and hoped for the best.

I had about 9m of fabric, 6m in a light green, another 3m in a very dark green (and a sash of a mint green, left over from the chemise I did). I split the light green fabric into two sections of 3m, lay the light green over the dark green and then cut a slit for my head. At this point the fabric fell off my shoulders by quite a ways, so I hand gathered it until it sat nicely on my shoulders, exposing my arms.


.

I then stitched up either side, leaving enough space for my arms to poke out, and cut the remaining 3m of green fabric in half lengthways, stitched bottom and sides together to make sleeves


A bit of hemming, a wig, some accessories and some make up later I'm ready to go!


In total the costume only took me about 2-3 hours to make, so it's far from perfect but I don't think it was bad for something that was thrown together on a whim.

Sunday, 15 September 2013

DIY Lolita dress: The blue dress 2.0, the nint dress

A good few months ago I started work on a replica of Krad Lanrete's Le Chuchotis de L'été, an it didn't go so well (see here).  The biggest problem was I didn't like the weight of the fabric, and recently came across some mint green chiffon which was much heavier. I decided to scrap almost the whole thing and painstakingly unpicked everything so all that was left was the lining. BEGIN AGAIN.

The Dress Body
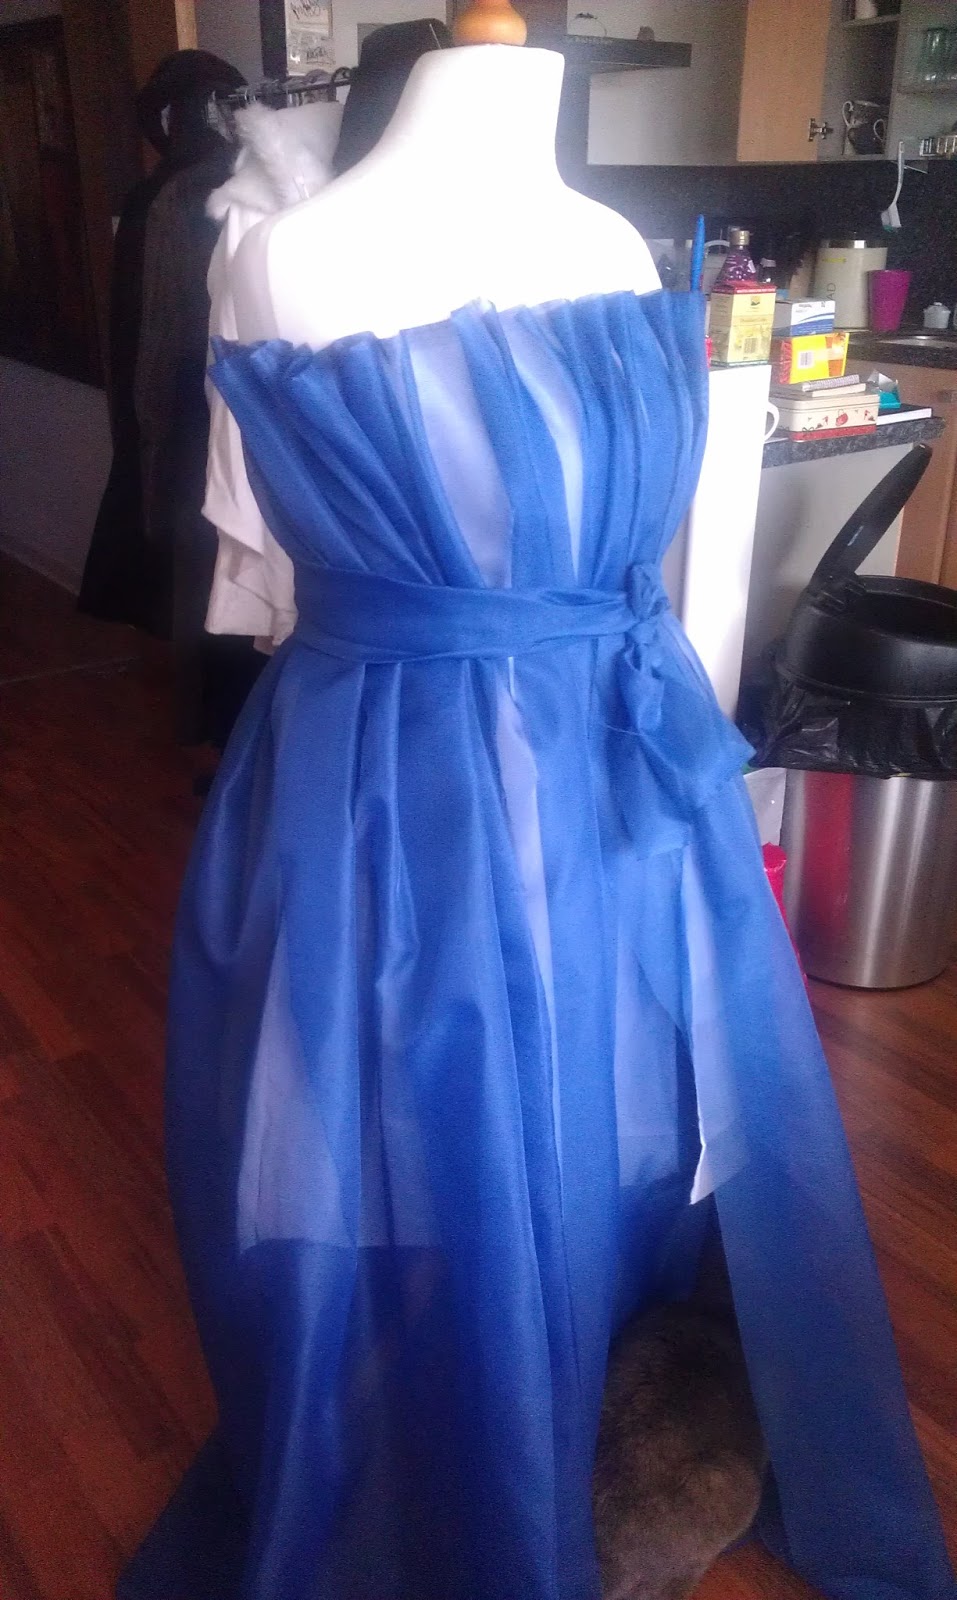
I lay the unpicked blue chiffon over the uncut green to get a basic idea of how much fabric I was going to be using (3m) and where the arm wholes were going to be. Then started pinning it to the mannequin. The easiest way to get the folds to look right was to stick a pin at the beginning of a section (eg, at the front of the arm whole) and at the end of a section (eg, the back of the arm whole), then a pin in the middle of the excess fabric, so you have two large loops of extra fabric. Keep halving the sections until you're happy with it, and can easily gather it. I realised very early on that most of this dress was going to have to be hand gathered. I worked my way around the dress pinning it into place until I thought it looked good, and tied a ribbon around the waist just to see if it sat right.


Then hand gather the chiffon and secure it to the lining. I found it easiest to stand and slowly work my way around the mannequin unpinning little sections then gathering them with thick black thread (so it would be easy to see and remove later. At the end of every section I pulled the thread taught and tacked the chiffon to the lining so that it didn't all fall off when it tried to take it off the mannequin.

The Waist
Next, the waist. The green ribbon marks the waist line, so I took a fabric pen and marked underneath the ribbon, removed it, and then gathered the fabric until it was taught against the lining.


The Neckline
 The neckline was the same principle again. I cut a long strip of fabric which was the length of the front, back and around the arms, then that length was doubled so that it could be gathered. It was cut 2 inches wider than it had to be, and an inch folded over on both sides all the way along the fabric piece (so you have one long strip with an inch tube at the top and bottom. I pinned the open ends at the front and kept halving the material until it sat correctly, then hand gathered it in place, with the gathering going along the stitching of the tubes.


However, once I tried it on I discovered that the gathering over the arms makes it very difficult to move. I stitched the neckline to the dress along the front and back, then added elastic on the parts that looked like capped sleeves to make movement easier. I stitched the top tube to a piece of netting just to make sure it held all the gathers in place.

The Ruffles
The dress body is 3m of fabric, so to make ruffles on the bottom I needed double that, so 6m of 15cm wide chiffon was overlocked (which was a complete pain in the ass, as it gathered the chiffon slightly) and then hand gathered (I tried repeatedly to machine gather and it just didn't seem to work) to the right length. Then I pinned it to the dress. The whole process took 4 hours (mostly because I had to regather half the ruffles because I got a knot in the thread.

Almost finished. Just the buttons and sleeves to do! So far it's looking good.


UPDATE. In a mad rush for an event 2 summers ago I finished the dress, wore it, and immediately sold it. PREPARE FOR EMBARASSING PHOTOS

As much as I enjoyed making this I'm incredibly uncomfortable with the colour. I was encouraged to buy it by someone else and only when I finally put it on did I discover it doesn't suit me at all. I also was a lot larger then and did an ABSOLUTELY hash job at co-ordinating it, as I realised I had nothing to go with it. However, I thought you should see the finished dress.


Tuesday, 16 July 2013

Victorian Chemise - Image heavy

A chemise is the undermost of all Victorian undergarments, often made from white cotton or linen, designed to protect the corset (and garments) from bodily dirt. It is a long, sleeveless dress, and the neckline style has varied over the Victorian era from square or round and undecorated, to more decoration and triangular necklines acceptable for day wear (initially they were for evenings only). It eventually evolved into slips in the early 20th century.

I attempted to make one without really doing a lot of research into what was acceptable for the time period, and took the pattern from Directoire Revival Fashions 1888-1889 (edited) by Frances Grimble. Absolutely fantastic book but quite complicated to use. All patterns have to be drafted from the book, but they are very simple and have a variety of scale rulers so you can draft your size without having to make too many calculations. Just measure bust size for bodices, waist size for skirts and away you go.


The pattern, as you can see, is for a square necked chemise with lace trim and insertions around the arm holes and neckline. In the description on the page over it suggests you add fine tucks and lace to the bottom (which I ran out of time to do). The second pattern piece is the yoke which I have absolutely no idea what to do with, so I omitted it.


Restricted by both my small table and my terrible laziness, I started drafting straight onto the fabric (huge pain in the ass, and entirely NOT recommended. I only managed because this is a very simple pattern. Easiest to measure down from the fold, then out at a 90 degree angle to do the widths.


Other issue with drawing straight onto the fabric, 90 degree angles are not 90 degrees anymore


Tiny table isn't very good for sewing
Next it was just a case of draw lines between all the dots, cut out one piece, and lay it over the rest of the fabric and trace it out.

Unfortunately I derped and didn't have quite enough width of fabric. To be fair, the chemise is so massive it's not really noticeable


Stitch the sides together and shoulder pieces together, and you will have a tent. Seriously, it is HUGE, but it is meant to be. What I should have done now was gather along the bottom of the neckline on both back and front, then add trim, but I decided not to do that so that I could have a bit more flexibilty of what I wear over the chemise (think it'd look silly of I try to wear it with a v-necked Victorian bodice). So add all the trim

Lace over green ribbon around the neck, with cord so that I could tighten/loosen the neck
Green around the arm holes, just because it's pretty.


And this is it being warn under corset and skirt (ignore my scruffy face)


Thursday, 13 June 2013

DIY Lolita dress: The Blue dress

I would like to be very clear that I take no credit for the design, and this was more an exercise in me getting to use my mannequin for the first time (kindly now dubbed Shirley - I have no idea why).

I first came across this dress a few months ago, and absolutely adored it, but knew there was no way I would fit into it. While it says it's free size, that's free size in Japanese sizes, so I'm already dubious, and when it states that the maximum waist size is 100cm I know I'm out (my waist will fit, but my bust is 112, and there's no way there's an extra 12cm in the bust. For anyone who's wishing to purchase the original dress, it is available in a wide range of colours from Krad Lanrete's shop on Taobao.


Now this is the first dress I have ever made without a pattern, so I started off by decontructing the dress in my head. I noted that it's a button up dress, lined, gathered at the bust (and probably the waist too, but more likely shirred), with ruffling detail around the collar and ends. So I figured I'd start with lining and basically pin it to the mannequin to make it fit. I put my petticoat on the manniquin so I could see if I would be getting the right kind of poof.


I ended up with 4 parts to the lining. Two front, one back with a triangular panel added at the back so the skirt part poofed out more. Now I was happy with how the lining was shaped while pinned, it was time to stitch the it together.

Now for the chiffon. I started basically the same way as I did the lining, only this time I added 3x as much fabric as I had for the lining on the front and back, and 1.5x the amount on the sides. Once it was pinned, I trimmed the lenth, tryking to make it slightly longer than the lining (and failing). At this point came the boring work: gathering. I painstakingly hand gathered each part (working front right, underarm right, etc around the body). I started noticing that I really wasn't happy with the fabric. It had the same see-through properties of the dress I'd been inspired by, but didn't seem to hang right. I took a good 15 minutes to correct all the folds in the second image. I hoped when I added more to the dress it would begin coming into place and sitting right.


.

Next for the collar. I pinned in place a tube of chiffon fabric (turned right side out), and gathered the collar in too places, about 2cm from each edge to create the ruffled look, then added some navy braid to hide any wonky stitching. I then added the button up part (interfaced) and tried the dress on. At the moment I really don't like this dress. I like the idea and the style, but after putting it on (and hurray! It fits!) I feel a bit like I'm in a costume for Violet Beauregard just after she eats the blueberry gum in Charlie and the Chocolate Factory. I figure with a corset or waspie or something that defines the waist (more than just the sash) it would look better, but I think a big problem is the fabric. I'm going to go on a hunt for better chiffon and see what I can find.